Search Maya Zest


Monday, January 31, 2011

Display Vertex Normals in Maya

An easy way to see the normals is to go into Lightning in the main window and un-check 'two sided lightning'.. this way all the faces with wrong normals will display black. I usually set it up right away when i start new project, the green lines are just way to confusing..

However if you wish you can also set the program to display vertex normals in maya you first access it by selecting the "display" menu up in the top

Then select Polygons>Custom Polygon Display. This will bring up the option box. Check normals and then apply. That's it!


Please check "HELPFUL" below if it was, if not COMMENT below and tell me why! Don't miss another tutorial or tip! Subscribe to Maya Zest  

Friday, January 28, 2011

Creating a nice brushed metal (anisotropic) shader with Mental Ray tutorial


ANISOTROPIC SHADER RECIPE

Here is a mix for creating an Anisotropic shader in Maya and Mental Ray. How good metal looks is very dependant on your lighting so keep that in mind.

CLICK HERE FOR THE DETAILED VERSION OF THIS TUTORIAL

Create a new Anisotropic Maya node and apply it to your object.

Now create a quick area light to hit up our object with. Menus: Create>Lights>Area Light. Position the light above your object.

I'm also just going to put a simple wood texture on the floor just to give us more
reflections to play with in the scene. Do a render to see what you are getting.

In your hypershade select your anisotrpic1 node. In the Attribute Editor under the drop
down Specular Shading DISABLE the Anisotrpic Reflectivity Checkbox. This will let you
control the level of reflectivity yourself.

Then make these settings to the anisotrpic

Reflectivity 0.736

Diffuse setting to 0.132

Spread X to 7.532 and Spread Y to 5.882

Roughness to .7

Fresnel Index to 2.0

Go to render options menu: Window>Rendering Editors>Render Settings. Then to the
Indirect Lighting Tab at the top of this you will see Image Based Lighting. Click the
CREATE button next to it. Immediately an IBL node system will be set up in your scene,
though it may look like nothing happened.

In the attribute editor it should open your IBL atributes. click the small folder to
load an HDR file. These can be downloaded from many free sites online.


Now we have nice anisotropic highlights but perfectly crisp reflections.

In the hypershade create a 2D as projection NOISE node. Make the following settings

Threshold 0.1
Amplitude 0.140
Ratio 1.0
Requency Ratio 1.744

Next in hypershade select the place2Dtexture node attached to your noise1 node. In the
attribute editor increase the "RepeatUV" fields to these values. U is first V second.

U 0.05
V 100

Basically, this just makes streaks. Now attach it to your Anisotropic shader's
reflections. First in the hypershade select the anisotropic_noise1 node. In your
attribute editor expand the Mental Ray drop down. You will see a Mi Reflection blur
attribute.

Now in your hypershade MIDDLE house click and hold down on the projection1 node. Drag it
over to the attribute editor and connect it to the Mi Reflection blur attribute.

The connection editor will appears. Connect OUTALPHA on the left to miReflectionBlur on
the right

Now let's render and see what we are getting.


To smooth grain of the reflection select your anisotropic1 node in the hypershade then
in the Attribute Editor expand the Mental Ray drop down and set the Reflection Rays
setting to 50.  


In your Hypershade under Create Maya Nodes, scroll down to the 3D textures drop down
and create a new Cloud node.

Connect the cloud node to the color aatribute on your anisotrpic node.

That's it you should have a very good starting place for anisotropic metals with this
shader.


If you want to pick up the exact shader that I am using in my Espresso scene at the top you can Subscribe to Maya Zest and I'll email it to you as a thank you.


Monday, January 24, 2011

Bump mapping a mia_material (wine glass)


First open the hypershade editor and select "create mental ray nodes" and create a new mia_material.

It the attribute editor on the right. Click and hold the "presets" button and select "glass thick>replace

Open the hypershade under create maya nodes>General Utilities>Bump 2d

This to creates a new 2d bump node.

Select the new 2d bump node then click the checker-box in 2d bump attributes next to "Bump depth"

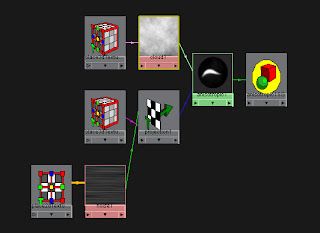
Select "file" from the create node dialog box, two 2d place texture nodes a stencil and a file node will appear. connected to the bump node.

Delete the stencil node, and the place node farthest away from the file node.

Select your file node and click the folder next to image name and choose the normal map you would like to use.

Now middle mouse button click and drag from your file normal map picture node to the bump 2d node.

in hypershade go to create mental ray node>materials>misss_set_normal (icon is black background with yellow arrows bouncing from a bluish lens.

Now middle click and drag from your 2d bump node to your misss_set_normal node. On releasing a menu will pop up select to connect "normal"

Now finally we can connect it to the mia_material node. middle click and drag from your misss_set_normal node to your mia_material node. Select "other" at the bottom of the pop up list.

In the connection editor that pops up select "outvalue" on the left side. scroll down and select bump on the right column. Press close at the bottom.

Lastly select your bump map node and in the attribute editor click the "use as" dropdown. Select Tangent Space normals. Because this is normal map not a bump map.


Congratulations you just created a bump map on your mia_material.


Please check "HELPFUL" below if it was, if not COMMENT below and tell me why! Don't miss another tutorial or tip! Subscribe to Maya Zest  

Thursday, January 20, 2011

Tutorial - Maya's Paint Geometry Tool


Maya's Paint Geometry Tool from Alex Villabon on Vimeo.

Please check "HELPFUL" below if it was, if not COMMENT below and tell me why! Don't miss another tutorial or tip! Subscribe to Maya Zest 

How to turn "Primary Visibility" off many grouped objects

To turn off "Primary Visiblity" on all objects quickly, use the Attribute Spreadsheet (Windows -> General Editors -> Attribute Spreadsheet) Select all your objects any way you choose (via the entire group or individually) select the top field "Primary visibility" field where it says "on" select the top one, hold shift and select the bottom one. Then type "off" in the top and press enter. The status of all sub objects will be set.


updated for creating layer overrides.


To do this as an OVERRIDE you have to do a specific action to make it work. With the attribute spread sheet pulled up. 

1. First select your objects in the outliner.

2.Click in the VISIBILITY box (where is says yes or no)
3. now shift click down in the visibility box of your last object. They should be tagged in blue. THIS WILL NOT WORK IF YOU JUST TRY TO SELECT THE OBJECTS THEMSELVES in the atrribute spreadsheet.

4. now go up to the Layer menu in the Attribute spreadsheet. Select "Create overrisde for selected.

5. Your items should still be selected. Now without clicking ANYTHING. Just type "on" or "off". and hit enter. DON'T use caps.It will create your layer override.

Please check "HELPFUL" below if it was, if not COMMENT below and tell me why! Don't miss another tutorial or tip! Subscribe to Maya Zest  


Maya Zest

The purpose of this blog is simply to post simple how to's that I have painstakingly figured out in Autodesk Maya. It will serve to jog my memory if I forget a particular technique and perhaps be helpful to you along the way. CG on chaps!!