Search Maya Zest


Friday, April 29, 2011

File formats for multi pass rendering compared


There are many formats that can be used for creating multi-pass renderings from 3ds max, Maya, etc. Here are some of the pros and cons of these formats laid out in comparison.

Thursday, April 28, 2011

Export After Effects CS3 camera paths to Maya, Max, Lightwave

Run this little script in After effects CS3 to export your AE camera path to Autodesk Maya, Lightwave or Max. I have only used it in Maya so far, but it works fantastic! Unfortunately though, I could NOT get the script to run in After Effects CS5, it crashes.

This script was graciously created by Ryan Gilmore (www.urbanspaceman.net)

In AE just go to file>scripts>run script file.

Here's the link.

Monday, April 25, 2011

Casting shadows from Physical Sun on a Use Background surface


Casting shadows from Physical Sun on a surface that has a Use Background shader

Issue:
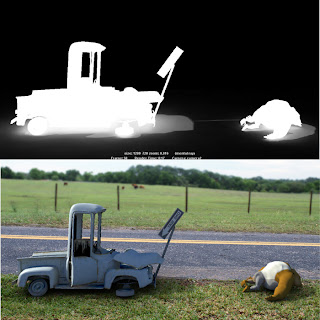
When you apply a Use Background shader to a surface, the Physical Sun does not cast shadows on the surface.

Solution:
To cast the shadows, please do the following:

1. First in render settings go to the indirect lighting tab, then select "create" next to physical sun and sky. This will create the physical sun lighting setup, which will look great but it won't cast any shadows on any use background shader objects.


2. Assign the Use Background shader to your surfaces.

3. In the Attribute Editor for the Use Background shader, turn off reflection.
Create a new Directional Light. You won't get the shadows with the default sky sun light. Put the new Directional Light above the original sun light and match the rotation of the original sun light.
In the Attribute Editor for the new Directional Light, set the intensity to .3 and turn on ray traced shadows.

4. Duplicate the new Directional Light, set its intensity to -.3, and turn off ray trace shadows.
The two directional lights cancel each other out, so that the default sun light controls the amount of light in the scene

5. Now select your camera in the outliner. In your viewport>Panels>panel>outliner.

6. In the attribute editor (accessible on the top right of the screen. three tiny icons it is the left most) Once your camera is selected you will see several tabs in the atribute editor on the right. choose mia_physical sky. Down near the bottom is a "use background, checkbox, clikc this box then hit the checkorboard button to the right. This will allow you to pick a material to use for the background. Select "surface shader" from the list of standar maya shaders.

7. Select a TGA for your Render and you are done! You have a alpha channel that captures the shadow being cast on the use background shader!

Please hit "helpful" below if it was!


Friday, April 22, 2011

enabling production shaders (MAYA)


Enabling Mentalray Production Shaders

Maya hides the Mentalray production shaders (mip shaders) by default. To enable the mip shaders as of Maya 2009 run the following MEL code by typing it in the script box at the bottom of Maya and pressing enter.
optionVar -iv "MIP_SHD_EXPOSE" 1;

Please check "HELPFUL" below if it was, if not COMMENT below and tell me why! Don't miss another tutorial or tip! Subscribe to Maya Zest 

2D layer tracking to 3D layer position (After Effects)

I needed a way to attached a 2d layer in after effects to a 3d layer which was moving in 3d space. Searching online led me to this brilliant little snippet of code which connect the two. Simply alt click the clock next to the position attribute of the 2D layer you want to follow the 3D layer. Then change the "my3DLayer" (only change what's between the quotes) to the name of the 3D layer you wish to match the movement of.

l = thisComp.layer("My3DLayer"); l.toComp(l.anchorPoint);
It works great! Please let me know if you found this useful!

Tuesday, April 19, 2011

Unwanted moving or animated UV MAP (MAYA)

Recently I had to do some UV map finagling and somehow managed to get my model into a state where if I moved the rig, one of the UV maps would literally slide around in the UV editor, causing the map to go crazy on that part of the model.

The solution!? Delete NON deformer history for the model.

edit>delete by type>non-deformer history

Check to make sure everything still works correctly and you are good to go!

Please check "HELPFUL" below if it was, if not COMMENT below and tell me why! Don't miss another tutorial or tip! Subscribe to Maya Zest  

Tuesday, April 5, 2011

How to find your MEL scripts path MAYA

Sometimes it's a pain to try and assertain where in the blazes your Maya MEL scripts folder actually is. Here is a quick way to locate it!

type "internalVar -usd;" no quotes into the MEL script box in the bottom left of Maya and hit enter.

Then pull up the script editor in the bottom right of Maya to view the path.


SPECIAL NOTE:
Apparently when you install MayaBonus2010 Tools your scripts path might get changed and even if you run the command above it will not tell you the correct location of your scripts folder. If you press the scripts box, very lower right of the screen in Maya. You can then select file>load script, and this should show you the new folder.
In my case E:/MayaBonusTools2010/scripts

That was a royal pain to figure out. It coudln't seem to locate my scripts folder anywhere...

If you come across any easy way to locate your Maya scripts folder please let me know!