1. Creating a realistic brick shader with randomly shuffled tiles in Maya.
This technique may look a little
complex but you will find it is very useful! You could use it to
create mixes of tiles for floors space ship hulls all kinds of things.
First create a simple polygon primative
menues Create>Polygon Primitive>cube and draw your cube in
the viewport workspace.
Hit 5 to go to shaded view.
The first thing we need is a nice
seamless brick texture, you can find many online just go locate one
just make sure it's SEAMLESS.
Now take this texture into photoshop or
your choice of image editor and on a new layer randomly draw
black squares over about a third of the bricks.
Over the remaining bricks randomly
drawing pure white squares over another 3rd of the bricks.
Finally draw 50% gray squares over the
remaining bricks.

Save it and calling it CONTROL_bricks
without the brick background so you just have a black/gray/white
image of the bricks.
We will use this texture to control
multiple tiles.
Next open your original brick texture
and make a Light, Medium, and Dark version of it. These will be
mixed together using our CONTROL_bricks
2. Now in maya let's open the hypershade
and create three new RAMP nodes. Under create Maya node, 2D
textures sub menu. RAMP.
Select your first ramp in the
hypershake work area and in the attribute editor on the right you will
see it's color gradient there is a little drop down called
interpolation near the top of ramp attributes change this to NONE. This
will create and instant color change instead of a gradient.

The first one we'll put the white at
the bottom, and have the black start at "Selected position"
.3
Now select your second Ramp and change
the interpolation. On this one we will place the white in the
middle Starting at "selected position.3 and ending at selected
position .6
Do the same to your final ramp only
start the white at .6 and end a 1.0
The idea is that these ramps when all
placed together will equal 1.0 so you can adjust them if you wish
just make sure they still end up all covering 100% with white
when mixed. If that makes sense.
Your ramps should look like this now.

3. Now we want to attach our CONTROL_crick
black/gray/white picture to these ramps.
Create a new file node in the
hypershape create maya node>2D texture>File
Select the black File1 node that is
created. On the right in the attributes editor you can now select an
image. Click the file and navigate to your CONTROL_bricks
Now lets connect our file1 node to our
ramps.
In the hypershade middle mouse click on
your file1 node and hold the button down dragging it over to
your "ramp1" node (NOT the place2dtexture)
A menu will pop up select "other"at
the bottom.
The coonection editor will appear. On
the left side choose outColor, then outColorR
Now in the right side choose uvCoord
then vcoord then hit close at the bottom.
Repeat this process connecting file1 to
Ramp2 and ramp3

Notice what happens to the ramps after
these connections are made. They become white blocks.
The "lower white-banded" ramp
now becomes the set of all noise blocks that were dark gray. The "middle white-banded ramp"
now becomes the set of all noise blocks that were middle gray.The "upper white-banded" ramp
now becomes the set of all noise blocks that were bright gray.
Those blocks will become mattes that
will control the presence or absence of one tile or another.
Now let's bring in the Light, Medium
and Dark versions of our brick texture.
4. In the hypershade create Maya sode>2D
textures>file
Create three final nodes. Select each
black file node and load your images. You should have something that's looks
like this. Starting to look kinda complex isn't it? Just wait.
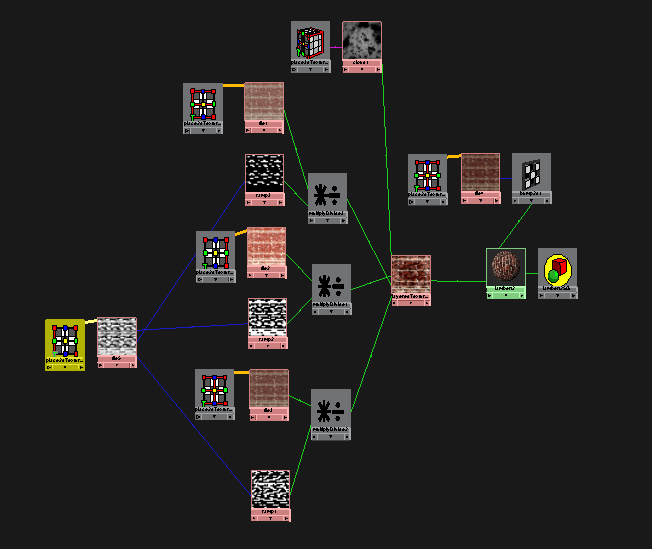
Now we are going to start adding it all
together into a shader.
Create three multiply/Device nodes. In
the hypershade> Create Maya
nodes>General Utilities>Multiply
Devide.
Place them all to the right of your
nodes. We are going to attach a Ramp and a File to each Multiply.
At the bottom middle click on your ramp
hold and drag to the multiply a menu will pop up select
input1. Now select the first texture middle click and drag it to the
same multiply release and a menu pop's up select input2
Do this with your remianing ramps.
Connecting one image file and one ramp. Now it should look something like this.

5. Now let's create a layered texture. In
the hypershade, Create maya nodes>Other Textures> Layered
Texture
Drag it off to the right side. This one
we have to attach a little differently. Select your layered
texture in your work Area. In the attribute editor there is a red box
under Layered Texture Attributes.
There is a green box sitting there
currently, click 2 more times in there to create to more inputs.
Now in your hypershake Work Area
middlclick drag from your bottom Multipy node to your multilayered texture. A menu pop's up, choose inputs[n].color >[1]
Do they same for your other multiply
nodes only select input [2], [3]
Now select your Layered Texture node in
the hypershade, the green boxes have now turned blue. Select each
of them and change the blend mode to add in the atribute
editor

6. We still need to attach that to a
"normal" shader so let's create a new lambert. Hypershade>Create Maya Nodes>Lambert
Select the Lambert in the hypershade
then middle click drag your layered texture over to the Color attribute in the common material attributes section of the atribute
editor on the right.
Now let's apply our newly created
Lambert and see what it looks like. Hmm not exactly what we had in
mind. It's to small we simply need to increase the UV repeats. But we
unfortunately have to do this in several places.
In your hypershade work area start with
the palce trexture node on your CONTROL_brick that we created
first. In the attribute editor on the right you should see 2D texture
placement attribute. Under that repeat UV. Change these values to
6. Then change this value across all of your 2d place textures
nodes (6 others)

That's looking more like it.
7. Last thing we want to do is add some
grunge.
Hypershade>create maya nodes>3d
Textures>cloud
You may want to adjust how the cloud
looks a bit in the attribute editor give it higher contrast etc.
Now middle click and drag the cloud
node onto your layred texture a menu pops up choose
inputs[n].color>[4]
Then select your layered texture select
the new cloud blue box at in the attribute editor and chane it's
blend mode to Subtract. You will probably need to play with the
cloud settings a bit but the idea is to use it as a sort of dirt map
to mess up the bricks.

8. Lastly you can connect the same brick
texture to your lambert bump field to get a nice bump map for
the same brick pattern and that's it! Have fun making bricks and
tiles and let me know how it works for you!
One very interestingly last note about this technique is that if you replace your starting file1 with something randomly generated you can achieve some truly random and unique results.
Please check "HELPFUL" below if it was, if not COMMENT below and tell me why! Don't miss another tutorial or tip! Subscribe to Maya Zest