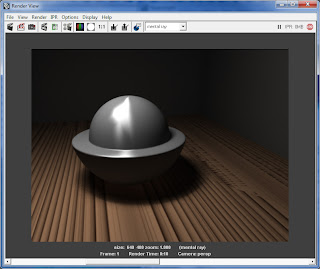
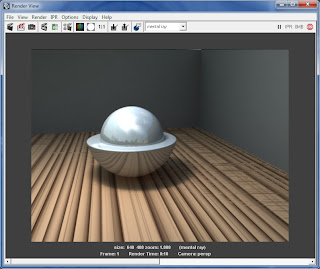
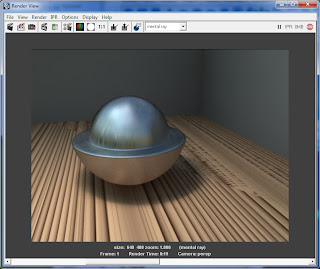
First off Anisotropic shaders are bit tricky, how good they
look has a LOT to do with the environment and lighting. You can
have the greatest shader in the world but unless those other two factors are also perfect you WON'T SEE IT.
ANISOTROPIC SHADER RECIPE
Here is a mix for creating an Anisotropic shader in Maya and Mental Ray. Be advised though depending on your situation, you will have to tweak the settings to make it work perfectly for you.
Here is a mix for creating an Anisotropic shader in Maya and Mental Ray. Be advised though depending on your situation, you will have to tweak the settings to make it work perfectly for you.
1. First open Hypershade:
Window>Rendering Editors>Hypershade
2. Now create a new Maya node. The
Anisotropic shader is under the surfaces category in the create maya
nodes drop down of the hyper shade.
A new anisotropic shader called
"anisotrpic1" will appear in the hypershade work area. You can rename it
whatever you wish.
3. In your viewport right click and
hold down the button on the object you wish to attach the shader to
while holding down the button move to menues: assign existing
material>anisotropic1
This will apply your material to the
object.
4. Now let's create a quick area light
to hit up our object with. Menus: Create>Lights>Area Light
Position the area light above pointing
at your object.
5. Now we need to turn on shadows for
the light. Select the light then in attribute editor go to the
Shadows drop down then Raytrace Shadow attribute drop down. Then select
the checkbox Use Raytrace Shadows.
Set Shadow Rays to 10.
6. Go to render options menu:
Window>Rendering Editors>Render Settings. Make sure that Mental Ray is
selected in the "Render Using" drop down at the top of the
Render Settings Window.Then go to the Indirect Lighting Tab, Final
Gathering drop down and ENABLE the Final Gathering checkbox.
I'm also just going to put a simple
wood texture on the floor just to give us more reflections to play
with in the scene. Do a render to see what you are getting.
Yeah it's pretty nasty looking, but
let's keep going.
7. Go back to your hypershade and
select your anisotrpic1 node. In the Attribute Editor under the drop down Specular Shading
DISABLE the Anisotrpic Reflectivity
Checkbox. This will let you control the level of reflectivity
yourself.
8. Change the Reflectivity value to
0.736
Then under Common Material Atributes
change the Diffuse setting to 0.132
Under specular Shading set Speard X to
7.532 and Spread Y to 5.882
Roughness to .7
Fresnel Index to 2.0
Metal will only look good if it has
something to reflect. So we are going to add some image based
lighting. (IBL)
9. Go to render options menu:
Window>Rendering Editors>Render Settings. Then to the Indirect Lighting
Tab at the top of this you will see Image Based Lighting. Click
the CREATE button next to it. Immediately an IBL node system will be
set up in your scene, though it may look like nothing
happened. Now click the Right pointing arrow to the right of the
Delete button.
In the attribute editor it should open
your IBL atributes. next to "Image Name" click the small
folder to load and HDR file. These can be downloaded from many free sites
online.
Navigate to your HDR file and click
open.
The look of your metal will totally be
dependant on which HDR file you are using but this is what mine
looks like at this point.
Now we have nice anisotropic highlights
but perfectly crisp reflections. Let's do something about
that.
10. In the hypershade Goto create maya
node, then under the 2D textures drop box select "As
Projection" Then select the NOISE node in the list of 2D textures. This
creates a new projection noise node. In the top of the attribute
editor you can rename it anistropic_noise1 Now select the
anistropic_noise1 node, and in the attribute editor make the following
settings.
Threshold 0.1
Amplitude 0.140
Ratio 1.0
Requency Ratio 1.744
11. Next in hypershade select the
place2Dtexture node attached to the noise1 node. In the atribute editor
increase the "RepeatUV" fields to these values. U is first V
second.
U set to 0.05
V set to 100
The purpose of creating this texture of
just lines is to use it to blur our reflections in an anisotropic
way. Profound huh?
12. Here is how to attach it. First in
the hypershade select the anistropic_noise1 node. The atrtribute
editor for it should display in the right side of the
screen. Expand the Mental Ray drop down. You will see a Mi Reflection
blur attribute.
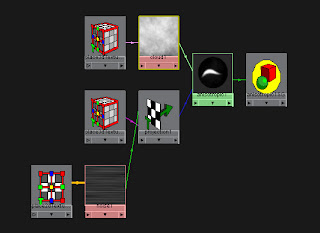
Now in your hypershade MIDDLE house
click and hold down on the projection1 node. Drag it over to the
attribute editor and connect it to the Mi Reflection blur attribute.
A very busy looking connection editor
will appear. In the left hand "outputs" list select
OUTALPHA
Then in the right hand side of the
connection editor select miReflectionBlur. and press close.
(MAKE SURE TO SELECT REFLECTION Blur AND NOT reFRACTION Blur
Now let's render and see what we are
getting.
Alright, the reflections are being
blurred by the noise but it looks ghastly. We need to smooth it
more.
13. To smooth grain of the reflection
go to your select your anisotropic1 node in the hypershade
then in the Attribute Editor expand the Mental Ray drop down and set
the Reflection Rays setting to 50. This will give it a lot
more quality.
Now let's see what we get.
Much better now we have something that
is really starting to look like real brushed metal. But it is
perphaps a bit to plasticy looking still. The solution to this is
to add an irregular "darking map."
14. In your Hypershade under Create
Maya Nodes, scroll down to the 3D textures drop down and create a new
Cloud node. The cool thing about creating this as a 3D texture is
that it will create an object in your scene you can then move
around to change the surface properties of your metal till
it looks just right.
Now make sure that you anisotrpic
shader is selected and you are looking at it's attributes in the
Attribute Editor on the right hand side. MIDDLE click and hold down
on the Cloud node (not the place3d one) and drag it over to the
Color attribute of your Anisotropic material. It should drop
right in.
Now here is how it looks as you can see
it has a much darker more natural metal feel. Especially at the
edges. You can move the green 3D cloud placement node around in
your scene to change the effect. Or select your cloud node and
change the contrast etc to lessen or increase the effect.
That's it you should have a very good
starting place for anisotropic metals with this shader.
Please check "HELPFUL" below if it was, if not COMMENT below and tell me why!


