This is not that difficult but there just doesn't seem to be that much information out there for Maya on this so I thought I would post a quick tutorial to help you out.
NEW UPDATE: If you are just trying to paint a simple greyscale displacement map in photoshop to place on your model this tutorial will show you how to do it, HOWEVER!
You will have far more CONTROL if you paint and export a floating point EXR displacement map in a program like Mudbox. This is because with floating point the displacement map's pixel values correspond directly to your 3D package's scene units. So a pixel value of 1.0 will displace your mesh by 1.0 scene units. A pixel value of 0.5 displaces your mesh by 0.5 scene units. And a pixel value of 0.0 doesn't displace your mesh at all. Further because the displacement map's pixel values are stored in floating-point format, they can contain pixel values far above 1.0, and negative pixel values far below 0.0. It's a great way to store precise displacement information.
A normal 16 bit image painted in photoshop doesn't have this ability so the tutorial below is limited. You may find yourself playing with the "displacement shift" and "displacement amount" settings trying to get perfect results because we aren't creating a floating point image. I have written a tutorial on using Ptex from Mudbox for displacement using V-ray for Maya here.
1. First make your displacement map in photoshop using 50% gray as your back ground. Anything 50% grey will have NO displacement. Save your file.
2. I'm presuming that you already have your VrayMtl ready to go that you want attach your displacement to. In your hypershade create a new "file node". Select the file1 node and in your attribute editor on the right click the folder and load the displacement that you saved out of photoshop.

3. Now create a new Displacement node

3. Now in the hyper shade MIDDLE mouse click on the file node. and holding drag and release the mouse on the displacment node. a menu pops up and select "default"
4. Now MIDDLE mouse click on the displacement node and holding drag and release on the VrayMtl material. A menu pops up select "displament" map at the bottom of the list.

5.Now in your viewport select your model. In the atribute editor select the (in my case) pPlaneShape1 tab.Then go to the atributes menu above and select vray>displacement control.

6.This will add a new "Extra VRay Attributes roll out to your in the atribute editor. Enter -.5 in the "Displacement Shift" setting. IMPORTANT: THIS SETTING WILL NOT WORK FOR ANY DISPLACEMENT MAP Only ones that you create specifically with this technique. 50% Gray as a starting point. See note at the bottom for additional information about this setting.

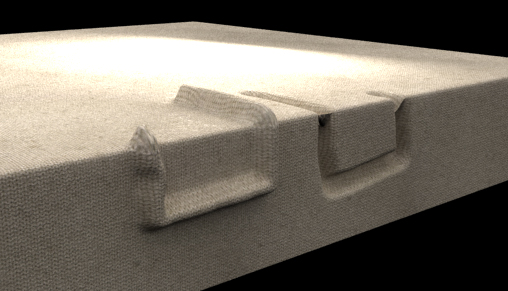
7. Render your scene and check out the displacement. Pure black will equal -100% displace. Pure white will equal 100% displace. Your 50% gray will make no changes.
IMPORTANT NOTE: The Displacement Shift setting basically creates a 50% gray point which you can shift. is also reflects how V-ray handles displacement. If you image doesn't have 50% gray as a midpoint then using -.5 won't necessarily work on your Displace map. In my tests a displacement map containing only black and white required a value of "0" for this setting in order to work properly.
Please check "HELPFUL" below if it was, if not COMMENT below and tell me why! Don't miss another tutorial or tip! Subscribe to Maya Zest